RackNerd VPS搭Xray Reality梯子 年付 $21.99 1G端口 3T流量 20G存储 1GB内存
1. 购买VPS
如果喜欢洛杉矶Los Angeles LA DC02机房, 3T流量 45G存储 2.5GB内存 2核CPU 年付 $18.66
如果需要更高配置的, 可以来 2025黑五列表 看看.
* 注意!只看“KVM VPS”,其它的比如“Hosting”是拿来建网站的,不能拿来翻墙。

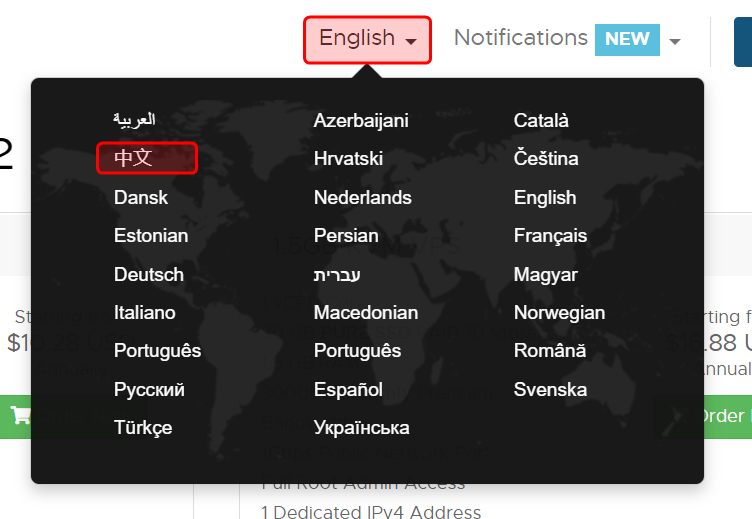
右上角 可以切换中文
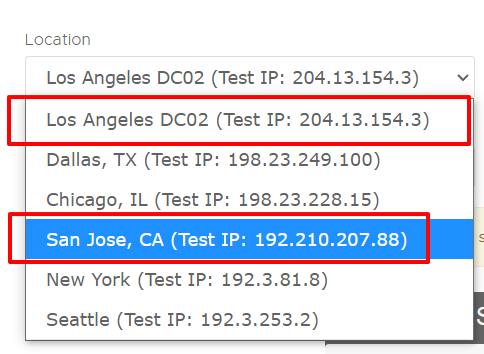
机房位置选择西海岸,比如 Los Angeles 或者 San Jose, Seattle
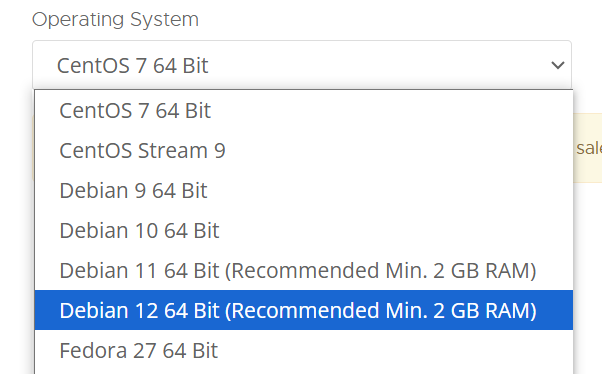
操作系统选择Debian12
(忽略那个最小内存值的建议. 个人使用, 纯搭梯子, 1G内存足够了)
继续购物车

结账

填写身份信息 设置你的账户密码
我填写的是真实的信息,如果你希望使用假信息,可以用在 https://www.dizhishengcheng.com/ 上找一个假身份信息。
生成随机密码可以用下面这个工具
git.io/xkcdpw选择付款方式 同意服务条款
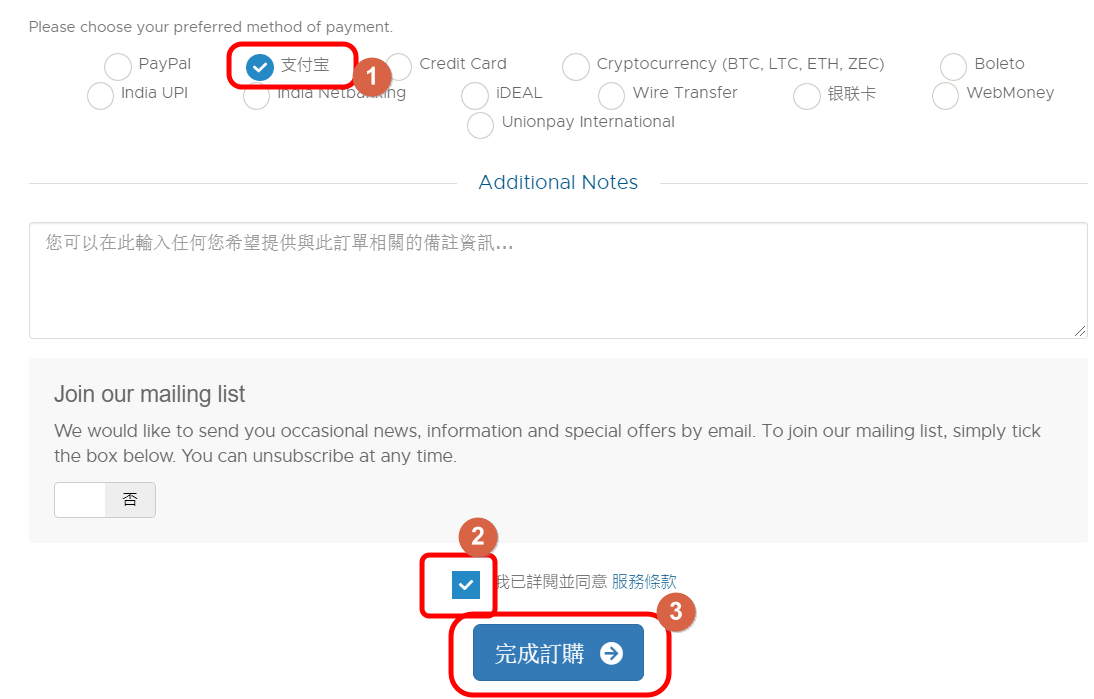
点击 Pay Now

扫码支持款项后,VPS就购买成功了
=======================================
2. SSH登录你的VPS
注意你的邮箱,会收到一封来自racknerd.com的,标题为“VPS Login Information”的邮件。
注意邮件中的以下信息

你可以用这些信息SSH登录你的VPS。
如果还没有SSH工具,推荐使用 Xshell(官方中文 免费 用邮箱注册一个Free For Home的License就行)
以下步骤会搭建 Xray 核心的 VLESS +Reality 模式
=======================================
3. 操作命令行在VPS上安装Xray
更新一下软件源信息。输入以下命令,回车。
apt update
安装curl
apt install curl -y
安装Xray 核心的 VLESS +Reality 模式
bash <(curl -L https://github.com/crazypeace/xray-vless-reality/raw/main/install.sh) 4 8443
* 注意,这是一行命令。如果想知道这行命令在干啥,请看
https://github.com/crazypeace/xray-vless-reality
也可以试着不带参数执行这个脚本,看看整个执行过程。
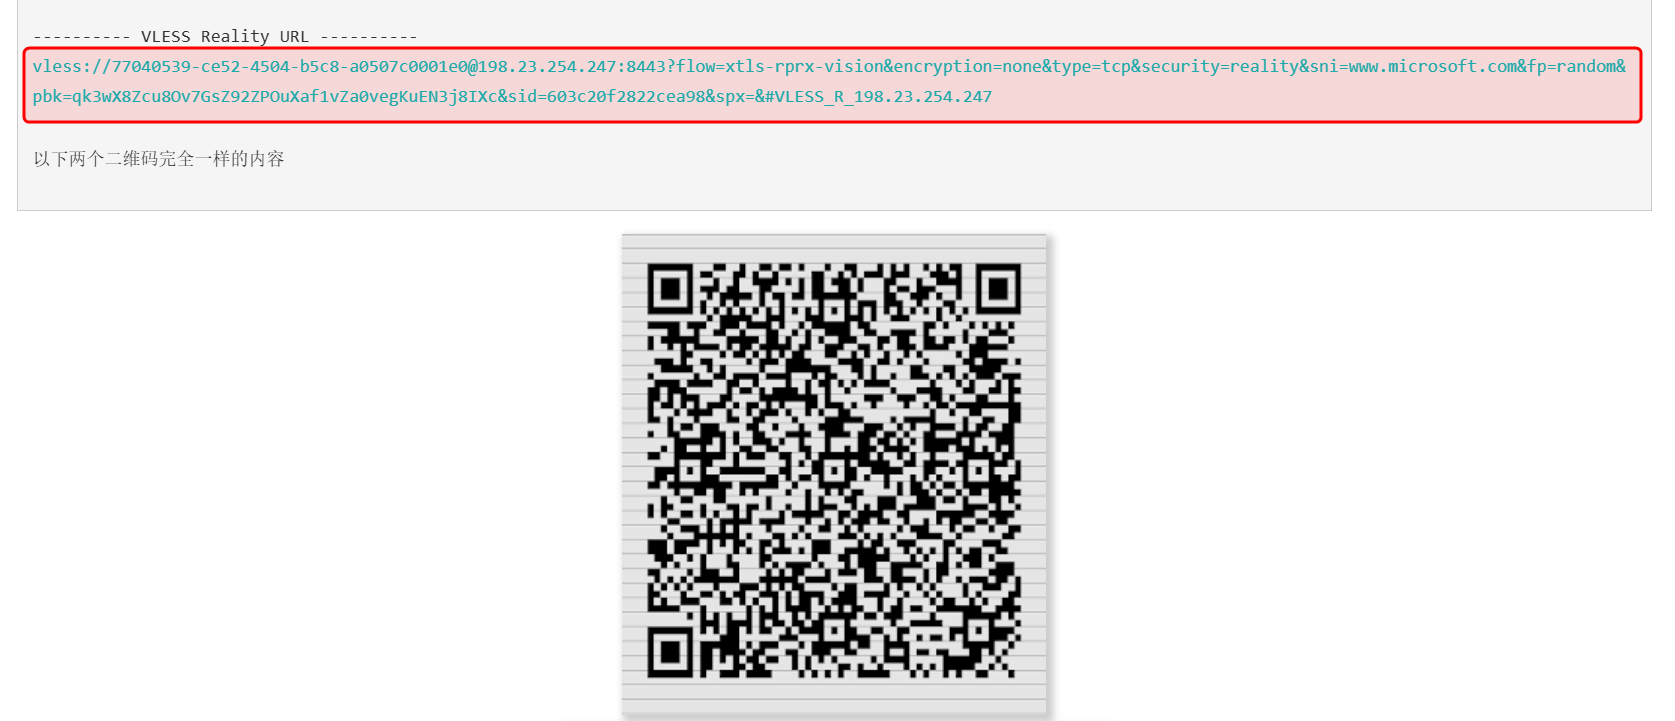
安装完成后,会出现vless://链接和二维码。
脚本会显示像下面这样, 其中框起来的就是节点分享链接.
=======================================
4. 在本地(Windows)安装v2rayN
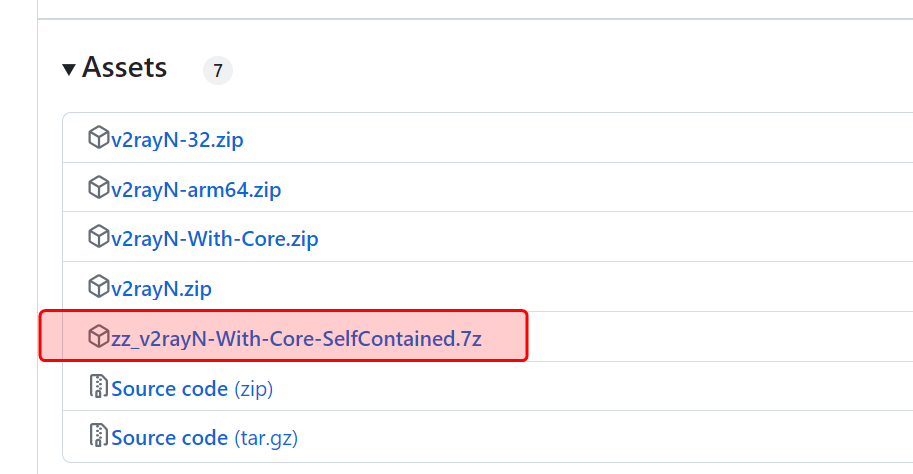
如果担心墙内的文件不安全,我们可以用vps下载,然后再从vps取回本地。
在SSH工具上输入 wget 下载链接,类似如下命令:
wget https://github.com/2dust/v2rayN/releases/download/6.23/zz_v2rayN-With-Core-SelfContained.7z
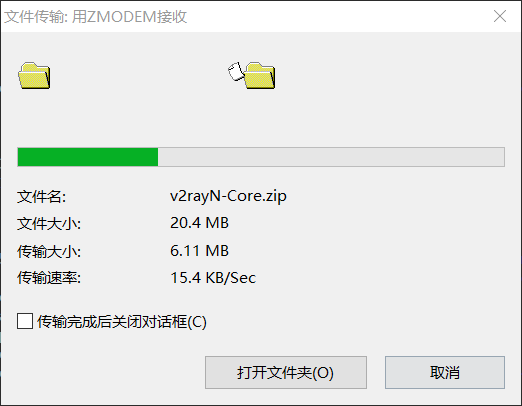
然后再输入 sz 文件名,把下载的文件取回本地,类似如下命令:
sz zz_v2rayN-With-Core-SelfContained.7z
取决于本地与VPS之间的速度,可能需要不少时间。
=======================================
5. 使用v2rayN
解压,运行v2rayN.exe
还记得第3步我们得到的vless://链接和二维码吗?
保持二维码露出,在v2rayN中选择菜单 扫描屏幕上的二维码
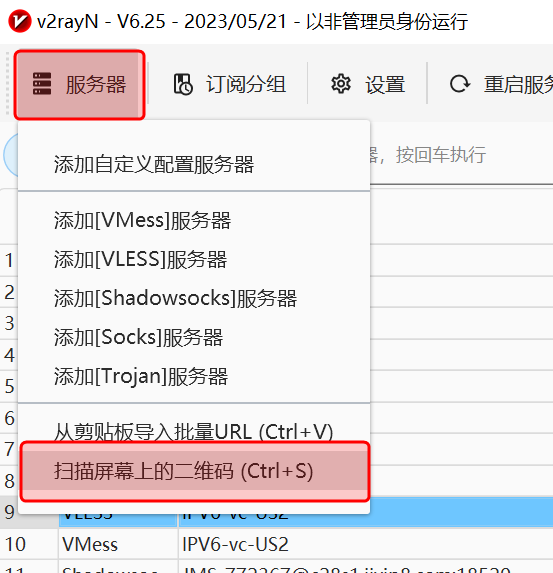
* 如果二维码显示乱码,或者总是扫描失败,你也可以选择整个vless://链接 (包括vless://),在v2rayN中选择菜单 从剪贴板导入
在v2rayN窗口的状态栏, 选择 PAC模式 和 绕过大陆.

点击“重启服务”
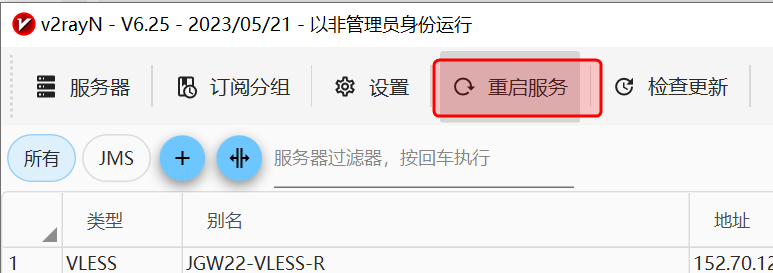
到此为止,你应该可以成功翻墙了。用浏览器打开google.com试试看吧~
=======================================后记
bash <(curl -L https://github.com/crazypeace/hy2/raw/main/install.sh) 4 2096
--------
附:一次完整操作的日志,请对比自己的操作。root@crazypeace:~# bash <(curl -L https://github.com/crazypeace/xray-vless-reality/raw/main/install.sh) 4 8443
% Total % Received % Xferd Average Speed Time Time Time Current
Dload Upload Total Spent Left Speed
0 0 0 0 0 0 0 0 --:--:-- --:--:-- --:--:-- 0
100 14831 100 14831 0 0 40301 0 --:--:-- --:--:-- --:--:-- 40301
_ ___
___ ___ __ __ ___ _| | _|___ __ __ _ ___
|-_ |_ | | |-_ | _ | |- _| | |_| |_ |
|___|___| _ |___|___|_|_|___| _ |___|___|
|_____| |_____|
此脚本仅兼容于Debian 10+系统. 如果你的系统不符合,请Ctrl+C退出脚本
可以去 https://github.com/crazypeace/xray-vless-reality 查看脚本整体思路和关键命令, 以便针对你自己的系统做出调整.
有问题加群 https://t.me/+ISuvkzFGZPBhMzE1
----------------------------------------------------------------
netstack: 4
端口 (Port) = 8443
用户ID (User ID / UUID) = 77041539-ce52-4504-b5c8-a0507c0001e0
SNI = www.microsoft.com
----------------------------------------------------------------
按 Enter 回车键 继续....或按 Ctrl + C 取消.
Hit:1 http://deb.debian.org/debian buster InRelease
Hit:2 http://security.debian.org/debian-security buster/updates InRelease
Hit:3 http://deb.debian.org/debian buster-updates InRelease
Hit:4 http://deb.debian.org/debian buster-backports InRelease
Get:5 https://dl.cloudsmith.io/public/caddy/stable/deb/debian any-version InRelease [7,505 B]
Fetched 7,505 B in 1s (11.3 kB/s)
Reading package lists... Done
Building dependency tree
Reading state information... Done
60 packages can be upgraded. Run 'apt list --upgradable' to see them.
Reading package lists... Done
Building dependency tree
Reading state information... Done
jq is already the newest version (1.5+dfsg-2+b1).
qrencode is already the newest version (4.0.2-1).
curl is already the newest version (7.64.0-4+deb10u6).
sudo is already the newest version (1.8.27-1+deb10u5).
0 upgraded, 0 newly installed, 0 to remove and 60 not upgraded.
官方脚本安装 Xray beta 版本
----------------------------------------------------------------
% Total % Received % Xferd Average Speed Time Time Time Current
Dload Upload Total Spent Left Speed
0 0 0 0 0 0 0 0 --:--:-- --:--:-- --:--:-- 0
100 28424 100 28424 0 0 103k 0 --:--:-- --:--:-- --:--:-- 103k
info: Installing Xray v1.8.1 for x86_64
Downloading Xray archive: https://github.com/XTLS/Xray-core/releases/download/v1.8.1/Xray-linux-64.zip
% Total % Received % Xferd Average Speed Time Time Time Current
Dload Upload Total Spent Left Speed
0 0 0 0 0 0 0 0 --:--:-- --:--:-- --:--:-- 0
100 11.8M 100 11.8M 0 0 11.4M 0 0:00:01 0:00:01 --:--:-- 11.4M
info: Extract the Xray package to /tmp/tmp.vypEfovaIX and prepare it for installation.
rm: cannot remove '/etc/systemd/system/xray.service.d/10-donot_touch_multi_conf.conf': No such file or directory
rm: cannot remove '/etc/systemd/system/xray@.service.d/10-donot_touch_multi_conf.conf': No such file or directory
info: Systemd service files have been installed successfully!
warning: The following are the actual parameters for the xray service startup.
warning: Please make sure the configuration file path is correctly set.
# /etc/systemd/system/xray.service
[Unit]
Description=Xray Service
Documentation=https://github.com/xtls
After=network.target nss-lookup.target
[Service]
User=nobody
CapabilityBoundingSet=CAP_NET_ADMIN CAP_NET_BIND_SERVICE
AmbientCapabilities=CAP_NET_ADMIN CAP_NET_BIND_SERVICE
NoNewPrivileges=true
ExecStart=/usr/local/bin/xray run -config /usr/local/etc/xray/config.json
Restart=on-failure
RestartPreventExitStatus=23
LimitNPROC=10000
LimitNOFILE=1000000
[Install]
WantedBy=multi-user.target
# /etc/systemd/system/xray.service.d/10-donot_touch_single_conf.conf
# In case you have a good reason to do so, duplicate this file in the same directory and make your customizes there.
# Or all changes you made will be lost! # Refer: https://www.freedesktop.org/software/systemd/man/systemd.unit.html
[Service]
ExecStart=
ExecStart=/usr/local/bin/xray run -config /usr/local/etc/xray/config.json
installed: /usr/local/bin/xray
installed: /usr/local/share/xray/geoip.dat
installed: /usr/local/share/xray/geosite.dat
installed: /usr/local/etc/xray/config.json
installed: /var/log/xray/
installed: /var/log/xray/access.log
installed: /var/log/xray/error.log
installed: /etc/systemd/system/xray.service
installed: /etc/systemd/system/xray@.service
removed: /tmp/tmp.vypEfovaIX
info: Xray v1.8.1 is installed.
You may need to execute a command to remove dependent software: apt purge curl unzip
Created symlink /etc/systemd/system/multi-user.target.wants/xray.service → /etc/systemd/system/xray.service.
info: Enable and start the Xray service
私钥公钥要在安装xray之后才可以生成
私钥 (PrivateKey) = MGY3Y2UwOGJlMmEyN2VhNGNmZTgzOGNjMDc3YTcwMHk
公钥 (PublicKey) = qk3wX8Zcu8Ov7GsZ92ZPOuXaf1vZa0vegKuEN3j8IXc
ShortId = 603c20f2822cea98
----------------------------------------------------------------
打开BBR
----------------------------------------------------------------
配置 VLESS_Reality 模式
----------------------------------------------------------------
配置 /usr/local/etc/xray/config.json
----------------------------------------------------------------
重启 Xray
----------------------------------------------------------------
---------- Xray 配置信息 -------------
---提示..这是 VLESS Reality 服务器配置---
地址 (Address) = 198.23.254.247
端口 (Port) = 8443
用户ID (User ID / UUID) = 77041539-ce52-4504-b5c8-a0507c0001e0
流控 (Flow) = xtls-rprx-vision
加密 (Encryption) = none
传输协议 (Network) = tcp
伪装类型 (header type) = none
底层传输安全 (TLS) = reality
SNI = www.microsoft.com
指纹 (Fingerprint) = random
公钥 (PublicKey) = qk3wX8Zcu8Ov7GsZ92ZPOuXaf1vZa0vegKuEN3j8IXc
ShortId = 603c20f2822cea98
SpiderX =
---------- VLESS Reality URL ----------
vless://77040539-ce52-4504-b5c8-a0507c0001e0@198.23.254.247:8443?flow=xtls-rprx-vision&encryption=none&type=tcp&security=reality&sni=www.microsoft.com&fp=random&pbk=qk3wX8Zcu8Ov7GsZ92ZPOuXaf1vZa0vegKuEN3j8IXc&sid=603c20f2822cea98&spx=&#VLESS_R_198.23.254.247
以下两个二维码完全一样的内容


---------- END -------------
以上节点信息保存在 ~/_vless_reality_url_ 中
这是一个 IPv4 小鸡,用 WARP 创建 IPv6 出站
有些热门小鸡用原生的IPv4出站访问Google需要通过人机验证, 可以通过修改config.json指定google流量走WARP的IPv6出站解决
群组: https://t.me/+ISuvkzFGZPBhMzE1
教程: https://blog.icdyct.nyc.mn/2022/03/racknerd-v2ray-cloudflare-warp--ipv6-google-domainstrategy-outboundtag-routing.html
视频: https://youtu.be/Yvvm4IlouEk
----------------------------------------------------------------
按 Enter 回车键 继续....或按 Ctrl + C 取消.
% Total % Received % Xferd Average Speed Time Time Time Current
Dload Upload Total Spent Left Speed
100 39234 100 39234 0 0 205k 0 --:--:-- --:--:-- --:--:-- 204k
__ ___ ____ ____ ___ _ _ _
\ \ / / \ | _ \| _ \ |_ _|_ __ ___| |_ __ _| | | ___ _ __
\ \ /\ / / _ \ | |_) | |_) | | || '_ \/ __| __/ _` | | |/ _ \ '__|
\ V V / ___ \| _ <| __/ | || | | \__ \ || (_| | | | __/ |
\_/\_/_/ \_\_| \_\_| |___|_| |_|___/\__\__,_|_|_|\___|_|
Copyright (C) P3TERX.COM | https://github.com/P3TERX/warp.sh
System Information
---------------------------------------------------
Operating System: Debian GNU/Linux 10 (buster)
Linux Kernel: 4.19.0-21-amd64
Architecture: x86_64
Virtualization: kvm
---------------------------------------------------
[INFO] WireGuard is installed and running.
[INFO] Disabling WireGuard...
Removed /etc/systemd/system/multi-user.target.wants/wg-quick@wgcf.service.
[INFO] WireGuard has been disabled.
[INFO] Getting the network interface IPv4 address...
[INFO] IPv4 Address: 198.23.254.247
[INFO] Getting the best MTU value for WireGuard...
[INFO] WireGuard MTU: 1420
[INFO] WireGuard profile (/etc/wireguard/wgcf.conf) generation in progress...
=============================================================================================================================================================================================================================================================
# Generated by P3TERX/warp.sh
# Visit https://github.com/P3TERX/warp.sh for more information
[Interface]
PrivateKey = sGu0lNSPjYwoP93bgx9FyLZZk3U5cfPX3EV+MPC4P2I=
Address = 172.16.0.2/32,2606:4700:110:8f90:b608:1a0:31f5:4b3b/128
DNS = 8.8.8.8,8.8.4.4,2001:4860:4860::8888,2001:4860:4860::8844
MTU = 1420
[Peer]
PublicKey = bmXOC+F1FxEMF9dyiK2H5/1SUtzH0JuVo51h2wPfgyo=
AllowedIPs = ::/0
Endpoint = 162.159.192.1:2408
=============================================================================================================================================================================================================================================================
[INFO] Starting WireGuard...
Created symlink /etc/systemd/system/multi-user.target.wants/wg-quick@wgcf.service → /lib/systemd/system/wg-quick@.service.
[INFO] WireGuard is running.
[INFO] Status check in progress...
----------------------------
WireGuard : Running
IPv4 Network : Normal
IPv6 Network : WARP
----------------------------
[INFO] Done.
重启 Xray
----------------------------------------------------------------

 博文
博文


这家机器大多数ip有问题 ip被谷歌拉黑 无法访问部分服务 我买了两台都是相同问题 使用ipv6才解决
回复删除看你怎么看了, 用的人多的VPS 难免会有这样的事情. 因为同IP段的使用者有可能跑爬虫啊.
删除访问GOOGLE的服务如果对速度要求不严格的话, 装WARP可以解决.
https://blog.icdyct.nyc.mn/2022/03/racknerd-v2ray-cloudflare-warp--ipv6-google-domainstrategy-outboundtag-routing.html
你给我的留言消失了,因为我回滚了快照,feed又被我搞消失了,所以就回滚了重新再来了一次。sep.cc
删除再去我博客留几个言吧,或者把之前留言补上,回滚了快照留言没了...
回复删除:) 没事. 也就是你有一张照片不错. 你愿意自己搭Gravatar镜像, 赞美你的添砖加瓦的精神. 这次走了南边, 以后可以走走北边, 从东北兴安岭走内蒙去新疆.
删除RN的机器我买过,其实还不错,不过后来有了甲骨文小鸡就没续了,这玩意365天有366天都有活动的样子...
回复删除对, RackNerd的机器 常年有货. 不像 CloudCone 几天就断货了.
删除